DIY Fireplace Mantel With Epoxy Resin l Full Build Tutorial
Got some wood lying around? Let’s repurpose it! In today’s tutorial, Steve with Upstart Epoxy shows you how he turned this piece of old, weathered cottonwood into a fully functional fireplace mantel. Stay tuned!
Skill Level: Beginner/Intermediate/Expert
Estimated Working Time: N/A
What You’ll Need:
- Upstart Epoxy Deep Pour Resin
- Upstart Epoxy Table Top Resin
- Upstart Epoxy Powdered Pigments Set
- Cottonwood Slab
- Slab Router
- Scrap Wood
- Tyvek Tape
- Heat Gun
- Planer
- Sander
- Finishing Oil
Preparing to Make Your DIY Fireplace Mantel
Our first task was cutting the pieces of wood that we were going to use and measuring them to fit in our mantel. This particular slab of wood had been sitting outside for a really long time, so it had started to warp. If you’re working with wood that’s in this condition, it’s best to make sure that you get it as flat as possible.
Folks, it's imperative that you make sure the bottom and the top of your pieces are nice and flush. That way, when you put it in the form, it lays correctly. Also, you won't get a leak underneath the wood when you do your pouring. Now that it’s flat, we got our handy dandy router, our slab jig, and we got all of our pieces straightened.
If you don’t want your pieces perfectly straight and would like them to have a little edge to them, you can get a heavy duty disk attachment for your grinder! They allow you to make all kinds of cool, unique, custom epoxy live edge tables, river tables, and many shapes on any piece of wood you choose!
Now it was time to whip up a quick form. We constructed the form out of scrap wood and Tyvek tape, then screwed it together. We also sealed all edges with silicone to prevent any leaks. Once we planed the wood and placed it in the form we were ready to commence our first pour!

The First Pour on Your Epoxy Mantel
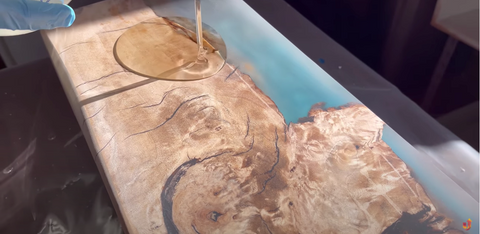
The theme of the mantel was a beach/oceanside view, so we decided to go with a tricolored pour, using blue, teal, and gray. After mixing our mica powders thoroughly with our deep pour epoxy, we went ahead and poured them all at the same time. This was so much fun! And the way that it came out was even more satisfying- we were really happy with the results. We poured up about an inch and a half of all the colored epoxy, saving some for a second layer once this first one cured.
After we observed everything, checked for leaks, and used our heat gun to make sure all of the bubbles were gone, we let it cure for 72 hours. Now, it’s time for that second pour! It’s very important that you mix the epoxy for your second coat very slowly, in order to reduce any possibility of small bubbles appearing and to get all of the cloudiness out of there. We poured a gallon of deep pour epoxy to fill the top of the wood, ensuring that the piece would be flesh on top. We stayed close by while it cured with our heat gun handy to rid it of any noticeable bubbles.

The Follow-Up Pours
Once it’s all cured up, we got our planer and went over it with 80-120 grit sandpaper to smooth it all out. This step is what gives the project a super smooth edge and attractive appeal once it's all finished. After making sure that all our edges were good, we were ready to pour that clear coat. This is where our table top epoxy, which is what really was going to give this project that wow factor!
We mixed the table top epoxy very slowly to avoid bubbles, then poured it right on. And it was really a thing of beauty! As with any two stage pour, this table top layer is going to showcase all of the details of the piece. Still really happy with the way this was turning out, we decided to let it cure for 24 hours after using our heat gun. Doing this makes sure that it's completely dried and that we don't have to worry about messing with it after we start refining.

Finishing Your DIY Fireplace Mantel
Now, that refining process. We used 80-grit sandpaper to remove any leftover bubbles off, and also because the cottonwood we were using is a very soft wood. Softer wood doesn't do well with high grit, and can add unnecessary scratches in your project. Once we were satisfied, we went up to 120-grit, ended with 180-grit, and finished the whole bottom surface with that. 180-grit gives a smooth surface, but still leaves your wood a bit porous, making it more realistic and rustic, instead of 400-grit, which is very smooth. To top it all off, we added some walrus oil to the underside of this piece and allowed it to soak in. Just like that, we were all done!


