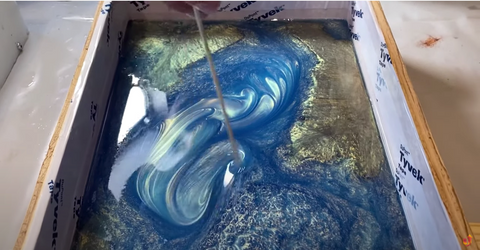
To Swirl Or Not To Swirl? DIY Epoxy Swirling Techniques
To swirl or not to swirl? In today’s tutorial, Steve shows you how to make swirls in resin add some depth,flair, and color to your epoxy projects by demonstrating two artistic techniques!
Skill Level: Beginner/Intermediate/Expert
Estimated Working Time: N/A
What You’ll Need:
- Upstart Epoxy Table Top Resin (Optional)
- Upstart Epoxy Deep Pour Resin (Optional)
- Upstart Epoxy Powdered Pigments Set
- Mixing/Stirring Sticks
How to Make Swirls in Resin: The Resin Swirl Technique Explained
Every epoxy artist has to decide whether or not to let their epoxy project cure naturally, or to swirl it to perfection. If you’re interested in adding some cool swirl effects, or just get some movement and natural lines in your epoxy, follow along to learn how to make swirls in resin.
You can do this with either table top or deep pour epoxy resin, but feel free to use any color from our powdered pigments set for added depth!
The first step to getting the perfect swirl is to wait until your epoxy has started to cure and solidify. This is usually about 8-12 hours into the curing process, and you’ll know when because the epoxy would have gotten to the consistency of peanut butter. It’s important to get to that point before you start to swirl, because that'll make your designs stay. If you swirl too early, all your hard work disappears, and that’s not what we want!

How to Swirl Epoxy Colors
To add the swirls, save a little premixed epoxy and add the powdered pigment(s) of your choice, stirring thoroughly. Then use a clean mixing stick to swirl that colored epoxy into your curing project. It’s as simple as that- there’s no right or wrong way to do this, just have fun with it.

Alternative Resin Swirl Technique
If you don’t want to get too artistic with the swirls but still want some natural flair in your epoxy, try this resin swirl technique technique! Stir your epoxy up frequently, which will give your epoxy some movement, causing it to naturally swirl. What you’ll do is go in and swirl every hour, on the hour, for the first five hours of the curing process.
The cool thing about this technique is that the movement will cause a lot of natural swirling at the bottom of your project, making it an all-around cool piece. You won’t get any intricate designs like you would if you tried the first swirling technique, but you will notice the difference this makes compared to just letting the project cure on its own! Now that you know both techniques, it’s all up to you- let us know, to swirl or not to swirl?


