New Year, New Home Decor: Ultimate Beginner’s Guide To Using Art Resin!
Looking to add a new hobby to your skillset for 2022? Why not spice up your space with some new home decor for the new year? In today's tutorial, Steve with Upstart Epoxy transforms a few pieces of pressed wood into AWESOME resin decorations for your home.
Skill Level: Beginner/Intermediate/Expert
Estimated Working Time: 48 Hours
What You’ll Need:
- Upstart Epoxy Table Top Resin
- Upstart Epoxy Art Resin
- Upstart Epoxy Powdered Pigments Set
- Pressed Wood Board(s)
- Router
- Krylon Fusion Primer
- Heat Gun
- Decal
- Sander
How Choose the Base for Your Resin Decorations
We started off by routing all the edges for the pressed wood boards that we planned on using for our resin decorations, and then followed this up with a Krylon fusion primer. We went ahead and used a darker color than our boards, because we knew this would help the powdered pigment colors blend in better later.
DIY Tip: you can also use any type of wood you prefer, but we highly recommend using a primer on top of the wood before pouring any epoxy!
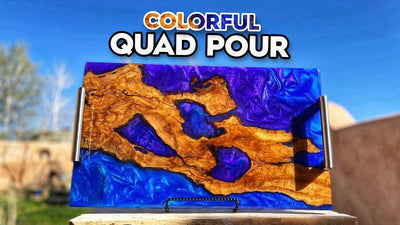
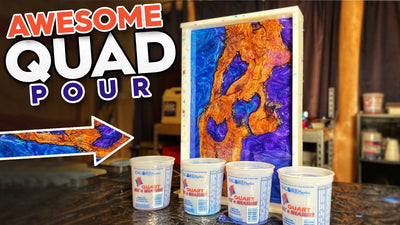
Next we mixed up a batch of Upstart’s art resin, paying close attention to the 1:1 ratio. We then mixed our epoxy resin with some of the fabulous colors in the mica powdered pigment pack- Sparkle Golden (Y76533), Silver Black (Y401), and Purple (Y470)- separately into different plastic cups.
Two Epoxy Resin Pours for a Layered Effect
Now it’s time to work on our first resin decoration! We began layering resin by conducting a dirty pour. A dirty pour is simply pouring two colors into one can or mixing cup, and then pouring them altogether.
Next, we moved on to our second board. Mix two cups of colored epoxy separately, but pour them at the same time from their respective cups. The colors for this pour were Yellow (YL2) and Purple (Y470.) Before moving on to the next step, make sure you use a spreader or paintbrush to make sure the epoxy touches all areas of the boards.
This type of pour gives you close to the same effect as the first pour, but allows for a different type of depth. These creative art pours are essentially the same concept as a flood coat and require the same steps, which ensures the piece will level out. The cool thing about these pours is that you can take it anywhere you want to go, it's all up to you and the way you want to design it!
Now we're going to do our second layers! For the first board, we poured more colored epoxy on top using Sparkle Golden (Y76533) and Deep Blue (BL3), and repeated this for the second board using Yellow (YL2) and Purple (Y470) again. Feel free to get creative with this pour- you can use a mixing stick to create lines, or just allow everything to blend in on its own. It’s up to you!
You can use a paint brush or spreader for blending in areas you're not happy with, or for helping the epoxy to overflow on the sides. Again, make sure that the sides are completely covered with epoxy and that there are no gaps or unblended areas.
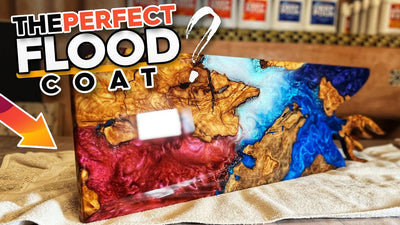
As always, we used a heat gun to get out all of those bubbles and allowed the project to cure for about 24-28 hours. Once it was cured, we went ahead and measured the board to find the center point. We then grabbed our decal, and placed it at the center. Now, it’s time for a final pour!
 Apply a Finishing Coat to Your Resin Decorations
Get ready for a flood coat! We mixed up a nice batch of table top epoxy resin and poured that right on, which took care of any bubbles that were underneath the decal. This flood coat will seal everything in, ensuring that there's no lines or rigid areas around or in your decal and base layer. It'll all be one smooth surface from here on out.
Now for the final step! Take your piece outside and grind off all the edges by pushing it through a sander, sanding it all the way to the top. Now, finish it off by attaching your mounting hardware. That's all, folks! These resin decorations came out gorgeous- crisp, clean, and perfect for being displayed in your home.